
I am sure that you have at the very least heard about the authorship markup that Google is pushing for lately. Whether this is a well elaborated plan to “lure” people into using Google+ or not, the fact is, they highly recommend it and regardless of whatever impact this could mean for SEO, I am guessing that it will eventually play its part and provide some advantage for users that are using it, over those who don’t. Here’s an excerpt from Othar Hansson, Software Engineer of Google.
We know that great content comes from great authors, and we’re looking closely at ways this markup could help us highlight authors and rank search results.
That said, and in a recent comment made by Ileane of BasicBlogTips in my weekly roundup, she mentioned that it would be nice if there was a WordPress plugin that can make all this authorship stuff less confusing. Well, I don’t blame her, because it is really quite confusing and I have spent several hours yesterday trying to figure it out for myself. While there is no WP plugin that will do the job (yet), there is a vital plugin that will you will need for this to work, specially if you have multi-authors in your blog.
Today we’re excited to share the launch of a shiny new version of the rich snippet testing tool, now called the structured data testing tool. The major improvements are:
- We’ve improved how we display rich snippets in the testing tool to better match how they appear in search results.
- The brand new visual design makes it clearer what structured data we can extract from the page, and how that may be shown in our search results.
- The tool is now available in languages other than English to help webmasters from around the world build structured-data-enabled websites.
Anyway, after doing a lot of research and countless trial and errors, I finally was able to verify my authorship markup with Google. Really, if you implement the authorship it is a great way to stand out from Google’s rankings. Lucky for you, if you have not done it already, I will show you exactly what I did to make this work, the easy way. By easy, I mean, no coding or editing any of your CSS or anything like that. Obviously, there are other ways to do it, but trust me, I got very frustrated yesterday, and what I will share with you today, seems to be the easiest way to get it done.
So, this is a two part process, the first being to establish your own authorship markup and the second to configure WordPress to allow inclusion of the rel=”author” and set links for your contributors or authors in their bio. Let’s get started..
[note]If you made any previous attempt to make this work and did not succeed, clear everything you made and start from scratch.[/note]
Create Your Google Author Markup
1) Make sure your profile is visible to the public. Go to your Google+ account profile > account overview > edit profile. Click the profile discovery box and ensure that “help others discover my profile in search engines” is checked, and save.

2) From the same Google+ profile (editing mode), create a link to point towards your site. Scroll down further and find “Contributor to”. Click on it and select add custom link. Enter the “label” you want and enter the link (full URL) to your HOMEPAGE. Make sure that it is visible to the public and hit save. You are now done on Google+. Hit the button “done editing” and move to the next step.

3) Link to your Google profile to establish a relationship between G+ and your site. You can do this by creating a G+ button and placing it somewhere in your site (or you can create a plain text link in your footer for example). Create your G+ button here. Then place your Google+ profile URL, select image size, copy the code and paste it somewhere where it will be present in all of your pages.

or alternatively, link to your profile using the syntax below:

You can see how I added the G+ on my sidebar right there on the top, right next to my RSS feed button.
![]()
4) Follow the steps on configure your site for multiple authors (next part). If you don’t have a multi-author blog, skip directly to the “test your authorship on Google’s rich snippet tool” below.
Configure Your WordPress Site For Multiple Authors
This is where that “vital” plugin comes into play. As you may probably know, WordPress removes any “rel” or html tags in the bio box, even if you attempt to create one. Reason aside, there is a workaround, by either editing your author.php file or installing a simple plugin that allows you to add anything you want in the bio box.
1) Install Allow REL= and HTML in Author Bios (WordPress repository) and activate it. The developer warns you about this plugin, which can be used inappropriately by your authors, so be sure you trust them. Once installed, activate the plugin and go to your WordPress users profile.
2) In the users profile dashboard, you will see that a new field has been created, the “Google Profile URL”. Insert your Google+ profile id here. This process would be the same for any other contributor or author. Do your own first and then for your authors (if you want). Rinse and repeat.

[note]For other authors, you do not have to install the G+ button. This is only required for the initial setup which is to establish the relationship between G+ and yourself. [/note]
3) Next step will be to add the “rel=author me” in the biographical information area. Note that I said rel=”author me” and not “rel=”author”. The reason for this is that WordPress creates a different page for each user and apparently the “rel=author” markup creates a problem. Adding the “me” solves this problem. After you’ve done this, do it for each author you have or ask them to do it for you.
Just to play it safe, add the “+” sign either at the beginning or the end of the anchor text. See that I used +DiTesco. Don’t ask me why, but again, Google recommends…

Google Rich Snippet Testing Tool
You are done! Now it is time to verify if all this works. Google has a tool that makes this very easy so head over to Google’s Rich Snippets Testing Tool, add your URL an hit preview. If all is good you will see the green “verified” authorship markup. If you receive an error, don’t panic like I did. Go over the process again and ensure that you have not missed something. Once you are verified, users will eventually see search results that show your “photo” next to the snippet. Great way to stand out, and if people already know you, the more likely your link would be clicked 😉

As I said, this is the easy way that worked for me, and thanks to Ken Morico who made this possible. There are other ways to do this and if you want to try other different methods, you can try these methods from Yoast, BlindFiveYearOld or SixEstate.
[note]Update April 2012: This method, according to several feedback I received, works 99% of the time. If for some reason you fall under the 1% that can not make it work, please let me know by sending me an email. I’m sure we can find a way of working together that could be beneficial for both sides :).[/note]
That’s it! Let me know if this method works for you. If you have a different method that you can share with us, please let me know so I can add this to the list of ways to verify Google’s authorship markup.
[note]If you are a registered contributor of iBlogzone, please send me your Google+ profile ID via email so I can set up your markup in your bio. Thanks![/note]
Related Posts
 YouTube, Structured Data Tool, Twitter Profile, WP Blogroll Ends, Speedlink 37:2012
![Rich Snippets and Authorship: Implementation and Benefits [infographic]](https://www.iblogzone.com/wp-content/uploads/2012/09/Authorship-and-Rich-Snippets-150x150.jpg) Rich Snippets and Authorship: Implementation and Benefits [infographic]
Rich Snippets and Authorship: Implementation and Benefits [infographic] Speedlink V30/2011, Online Marketing, SEO, Social Media, Authorship Markup
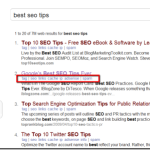 Blekko: Search Engine Or All In One SEO Tool?
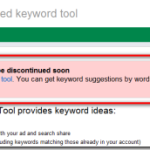 Google Search Based Keyword Tool To Be Discontinued
 Bing SEO And Webmaster Tools
 Site Speed: An Important SEO Ranking Factor?
 Microsoft’s (BING) Free SEO Toolkit Update
Comments are closed.